In this section, we’ll be downloading and installing Visual Studio Code (VSC), a free development tool from Microsoft. We’ll then pull in the code from the previous project, add a few things and see that it’s able to run correctly. At that point, with a set of simple tools (CMD, Notepad++), along with the more complicated IDE, the reader should be able to follow through any tutorial without needing any further help.
VSC may be downloaded from here: code.visualstudio.com/Download
During the install, along with agreeing to most defaults, also watch for the opportunity to include the option to create a Desktop icon.
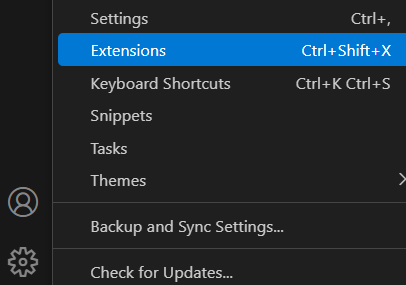
On first run of VSC, the Python extension will be needed. Click the Manage icon (looks like a gear, in the lower-left corner of the main window), and choose Extensions:
In the search field, type python, and wait a few seconds for it to populate. (The window separators are movable, so feel free to slide those around to make more text visible.)
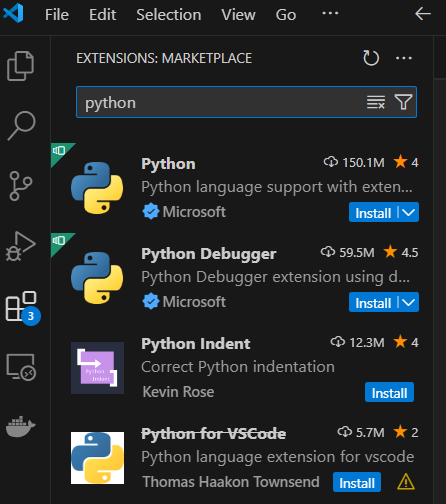
The first two items on the list are (as of this writing anyway) Python and Python Debugger. Although having language support for Python available within VSC is very helpful, having a debugger is essential. The language support will provide extra help text and prompt with function help while typing. The debugger will allow you to step through each line of Python code within your program, watching the contents of variables as they’re updated.
Another thing to note here is that each of these extensions shows that they’re sourced from Microsoft:
![]()
The following down imply that non-Microsoft items are all bad. But, when given a choice between something written by an unknown versus something that comes from (and is likely actively maintained by) Microsoft, choose Microsoft’s.
So, for full information, click once on the Python (extension) title line, and the information pane should populate with details on the extension itself, including comments about the debugger it’ll be including. Click the Install button just below the Python extension, and the buttons for Python and Python Debugger will change to Installing…
When it’s done, VSC’s main window will show help text, including guides for starting a new Python project. Although you’re welcome to use these hints and helps, it’s suggested you use the standard menus to allow your getting used to the environment sooner.
So, under the File menu, choose Open Folder. Find your way to your Projects folder, and create within that a VscTest folder. If prompted whether to trust the authors of this folder, check the box for Trust the authors of all files… and then click the Yes, I trust the authors button.
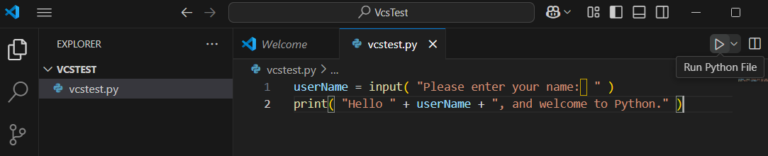
Under the Explorer pane, hover over the new folder, and click the new file icon. This will open a field below in which the name of the new file may be entered. Enter whatever makes sense (vsctest.py, for example), and press [Enter].
The new file should be created, and its editing window should appear in the right pane.
Within that, enter the following, which are the same lines from the inout project:
Note: if any errors appear, or you’d like to save a bit of time typing, feel free to copy the text from the inout.py script and pasting it into VSC’s edit pane.
Click the Run Python file icon (will look like media play symbol over the upper-right area of the text window).
In the lower section of the window, after clicking the Run (Play) icon, a Terminal pane should appear, showing similar output as the previous project. Test it by entering your name, and confirming it behaves as before.
Update the file to appear as follows (in case you’re wondering about these changes, there’ll be a section at the end of this article that’ll try to explain):

Plain-text version follows, in case errors pop up:
Run this again, and the input will look the same, but the output will be a bit like talking to a salesperson on the phone:

Note the “PS” at the beginning of the terminal’s display. This shows that the Windows PowerShell command is being run first, to execute the python.exe (interpreter), which will run our Python script (vcstest.py). So, this shows a bit of extra overhead before getting to our original script.
This same file can be run directly from the command-line. Use File Manager to browse to the same folder. In the address field, enter CMD. Within the command-prompt window, run the script:
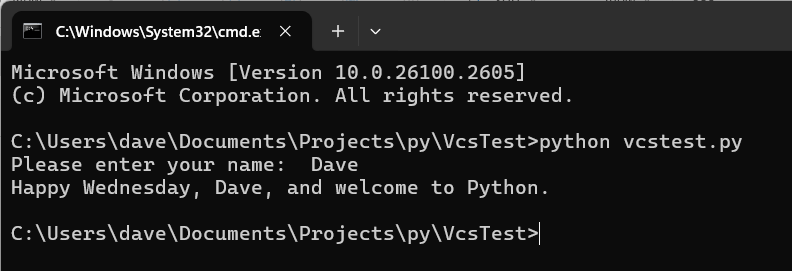
In the end, the tool to use for writing the code, and how to run it is completely up to you, whatever’s most comfortable to your learning style. The main point here is that Python code can be run from anywhere; it doesn’t need to be run in VSC, even if that’s what was used to write the code.
The big benefit to being familiar with VSC is that its Python extension included a debugger. (A follow-up article to demonstrate use of the debugger might be appropriate.)
Classes, Objects and Methods
Regarding the code changes in the test example above…
Before going further: This section is completely optional. There’s no need at this point to understand object oriented programming — aka OOP. This is just included in case you’re curious where these extra lines come from and how they’re used. In fact, even though Python is object-oriented, one is never required to learn OOP to be a successful programmer. On the other hand, there are advantages to OOP — which could be a subject of another study — so don’t automatically write this off as a waste of time.
Now, back to the regular scheduled programming…
… in addition to providing us a “quick” way to get the name of the day of week, this also will open things up a bit for an eventual discussion regarding Object-Oriented Python.
Here’s the code that was added to the original InOut project:
Python code can be written that is completely stand alone, not needing any “outside additions.” To be truly independent, though, we’d have to write all our own functions, such as, for example, something to display the day of the week. As it turns out, somebody else had run into the same situation as we had, needing the text version of the day-of-week, so they wrote a function, and the Python governance agreed to incorporate it into the available distribution as a module.
To access the abilities of any module, we need to import it. In this case, the specific set of modules is called “datetime.” Within the datetime module is a thing called a class, also called “datetime.” A class is a type of object. In our physical world, an example of a class might be a ball. The ball class could include actions (or “methods”), such as kick, catch and throw.
In the case of datetime, there’s a method called now(). As can likely be guessed, now() gives up the local system time as of “now” — whatever it is — but it reports it in epoch-time. Epoch-time on most computers is the count of seconds since January 1, 1970. If we asked for the date/time as of now, it would come back as some huge number. The computer would understand it, but we won’t be able to directly know what it’s talking about.
The datetime class also includes a method for translating the epoch time number into various formats, including a string: strftime (string-format-time). If we were to call upon strftime() without an argument (between the parenthesis), it would come back with some standardized string representation of the epoch time. In our immediate case, we just want the text representation of the day-of-week. The format argument of “%A” tells strftime to show that day-of-week by itself.
Whenever we need something in any programming language, we can look it up easily online, such as how I found this use… I searched for “python day of week,” and it eventually led to something like this at PyTutorial.com.
The result of that second line of code is that it gets the present epoch-time, then formats it into a string using just the day-of-week, placing that into the variable, dayOfWeek.
Finally, as with other print() statements, we use the + symbol to add these strings together into a single line.